Setting up Snapcast on Debian 12 Bookworm
March 5, 2024Snapcast is an open-source project that allows you to play audio into multiple rooms from one source, similar to a Sonos speaker system. In this article, I go through the steps to set it up on a Debian 12 (bookworm) server.
How it works
Snapcast consists of two executables, snapserver and snapcast. Snapserver collects audio from various sources, then snapclient plays that audio into the world. Snapserver synchronizes each snapclient to play audio simultaneously with any others on the network.
Snapserver might pull from local files, a streaming service such as Spotify, or a local but external source such as bluetooth or AirPlay.
Version
Snapcast v. 0.26.0 is available in the stable Debian repository, but v. 0.27.0 is 14 months newer (December 2021 vs February 2023) and available in the Debian backports repository.
Installation
Caveat
First, a quick note: the order is important. The debian build of snapclient v 0.27.0 has an error in its dependencies, but if you install snapserver first, the dependencies will be fulfilled. So on both the machine which will run snapserver and any other machines, I will first install snapserver and then snapclient.
To prevent multiple snapserver instances from running on the network and causing conflicts, I will mask the snapserver service on any machine which will be snapclient-only. Masking the service prevents it from starting on boot and also prevents it from being started by a command (‘snapserver’ and ‘snapclient’ are very similarly named, after all). To mask the service run:
$ sudo systemctl mask snapserver
Installing snapserver from Debian backports
The backports repo is not available by default, so I needed to add deb http://deb.debian.org/debian bookworm-backports main to the apt sources list in the file /etc/apt/sources.list. You can also add non-free-firmware, contrib, and non-free if you would like to include those package types. You can read more here if you’re curious about the behavior of which repo packages are installed from when you run apt upgrade when you have both backports and updates in your sources list.
Then, to install a package from backports run:
$ sudo apt install -t bookworm-backports package-name
In this case, the package I need is snapserver:
$ sudo apt update
$ sudo apt install -t bookworm-backports snapserver
Installing headless (without a GUI) snapclient from the project repo
Snapserver will not do much without snapclient. Since my snapclient hosts will be headless, I will actually prefer to download the package directly from the GitHub releases page instead of from the Debian package repository. The project builds a version without pulse audio, which is unnecessary without a GUI - ALSA will suffice. I’ll select the file snapclient_<version>_without_pulse_<arch>.deb and install it:
$ wget https://github.com/badaix/snapcast/releases/download/v0.27.0/snapclient_0.27.0-1_without-pulse_amd64.deb
$ sudo dpkg -i snapclient_0.27.0-1_without-pulse_amd64.deb
$ sudo apt install -f  #fixes dependencies
Configuration: snapserver
Each source is configured in /etc/snapserver.conf. I will set up three: Spotify using librespot, AirPlay2 using shairport-sync, and bluetooth. After adding each source, I will restart the snapserver service:
$ sudo systemctl restart snapserver
librespot
librespot is an open source library that sets up a Spotify Connect server/endpoint. Since my wife and I use Spotify, this means we can both play music from our phones while on our home network without needing bluetooth.
Installation
librespot is a rust project available as a crate on the Rust package manager Cargo. Because I want librespot to be available for unattended use, I won’t use the ‘simple’ installation method to install Rust and Cargo (which only installs it for the user running it), and instead I’ll follow the instructions from this forum post and download the tar ball for my architecture from the standalone installers list, extract it, and run the install script:
$ wget https://static.rust-lang.org/dist/rust-1.76.0-x86_64-unknown-linux-gnu.tar.gz
$ tar -xf rust-1.76.0-x86_64-unknown-linux-gnu.tar.gz
$ cd rust-1.76.0-x86_64-unknown-linux-gnu/
$ sudo ./install.sh
Then I’ll install the librespot package using Cargo. Because I want librespot to be available for all users, I’ll specify the directory as one that should be in every users’ PATH, then test it is available for my user as well as root (the only other user account on this server):
$ sudo cargo install --root /usr/local librespot  # see note below
    Updating crates.io index
  Installing librespot v0.4.2
    Updating crates.io index
   Compiling libc v0.2.153
   ⋮
   Compiling librespot v0.4.2
    Finished release [optimized] target(s) in 3m 21s
  Installing /usr/local/bin/librespot
   Installed package `librespot v0.4.2` (executable `librespot`)

$ which librespot
/usr/local/bin/librespot

$ sudo which librespot
/usr/local/bin/librespot
Note: the root path is /usr/local because Cargo assumes it is installing in the bin directory of the root path, so librespot will be installed in /usr/local/bin - my intended destination.
Installing librespot required a linker and pkg-config, so I installed the build-essential and pkg-config packages. Since Cargo technically compiles the project instead of downloading a binary, I also needed to install the ALSA development library package, libasound2-dev, so that it can access the correct header files or whatever.
Configuration
To add librespot as a source for snapserver, edit /etc/snapserver.conf and add the librespot url to the [stream] section. The snapserver documentation lists all the configuration parameters, but we will only really need the name and devicename parameters. name sets the name that will be displayed by snapserver. devicename sets the name which will be displayed in the Spotify apps on our devices. I also decided to set autoplay=false, because I prefer curated playlists to Spotify’s algorithmic ones. Note that special characters (such as spaces) must be URL encoded:
[stream]
source = librespot:///usr/local/bin/librespot?name=Spotify&devicename=DadBug%20Multiroom&autoplay=false
Update 2024-03-16: I noticed that some songs were playing louder than others, so I added normalize=true. I also decided to add a cache for audio and settings, just in case, so I created the directory /var/cache/librespot and passed it as a parameter: cache=%2Fvar%2Fcache%2Flibrespot. I will need to keep an eye on that directory to make sure it doesn’t get too large, but I don’t expect it to be a problem.
Shairport Sync
Shairport Sync is a program that acts as an AirPlay player. It can receive audio from iOS, iPadOS, or macOS devices, or some other players. It lets me play audio from my iPhone or iPad from apps other than Spotify - for example podcasts or YouTube.
Installation
Shairport Sync is available in the Debian package repo, but it’s version is 3.3.8, which was released in April 2021. The current latest is 4.3.2, released in October 2023. Shairport Sync 4 supports AirPlay 2, which is a bit more flexible and better incorporated with iOS. Shairport Sync links to this article, which gives an overview.
To get the latest version, I’ll need to follow the build instructions, skipping directly to step 2 - installing dependencies - because I do not have an old installation to remove:
$ sudo apt install --no-install-recommends \
     build-essential \
     git \
     autoconf \
     automake \
     libtool \
     libpopt-dev \
     libconfig-dev \
     libasound2-dev \
     avahi-daemon \
     libavahi-client-dev \
     libssl-dev \
     libsoxr-dev \
     libplist-dev \
     libsodium-dev \
     libavutil-dev \
     libavcodec-dev \
     libavformat-dev \
     uuid-dev \
     libgcrypt-dev \
     xxd
Some of these, such as build-essential and libasound2-dev were installed when setting up librespot, but there’s no harm in trying to install it twice - apt keeps track of installed packages and their versions and will upgrade it if a new version is available or skip it if not.
Shairport Sync’s AirPlay 2 support requires a companion app called NQPTP. I cloned the git repo and then ran the build commands, checked that the binary was available, and started the service:
$ git clone https://github.com/mikebrady/nqptp.git
$ cd nqptp
$ autoreconf -fi
$ ./configure --with-systemd-startup
$ make
$ sudo make install

$ which nqptp
/usr/local/bin/nqptp

$ sudo systemctl enable nqptp
$ sudo systemctl start nqptp
Next, I’ll clone the Shairport Sync repo and build it with some slight differences from the recommended configuration. Instead of ALSA, snapcast expects to read audio from shairport-sync's stdout and since snapcast will call shairport-sync, we can remove the daemon flag (--with-systemd). Adding the --with-metadata flag will send album art and title information, which can then be displayed on some snapclient interfaces.
Here’s the end result:
$ git clone https://github.com/mikebrady/shairport-sync.git
$ cd shairport-sync
$ autoreconf -fi
$ ./configure \
    --sysconfdir=/etc \ #shairport-sync will look for the config file in this directory
    --with-stdout \     # required for snapcast compatibility
    --with-soxr \    # enables resampled interpolation, optional but recommended
    --with-avahi \   # required, enables AirPlay 2 discovery
    --with-ssl=openssl \   # required for AirPlay 2
    --with-airplay-2 \  # required for AirPlay 2
    --with-metadata     # optional, but I believe this enables showing album art
$ make
$ sudo make install
$ which shairport-sync  # we'll need the path for the snapserver configuration
/usr/local/bin/shairport-sync
If, like me, you forgot to install all the library packages, the configure script will helpfully complain about it so you can go back and install them.
At this point, shairport-sync can be run from the command line and it should appear as a device in the AirPlay menu:
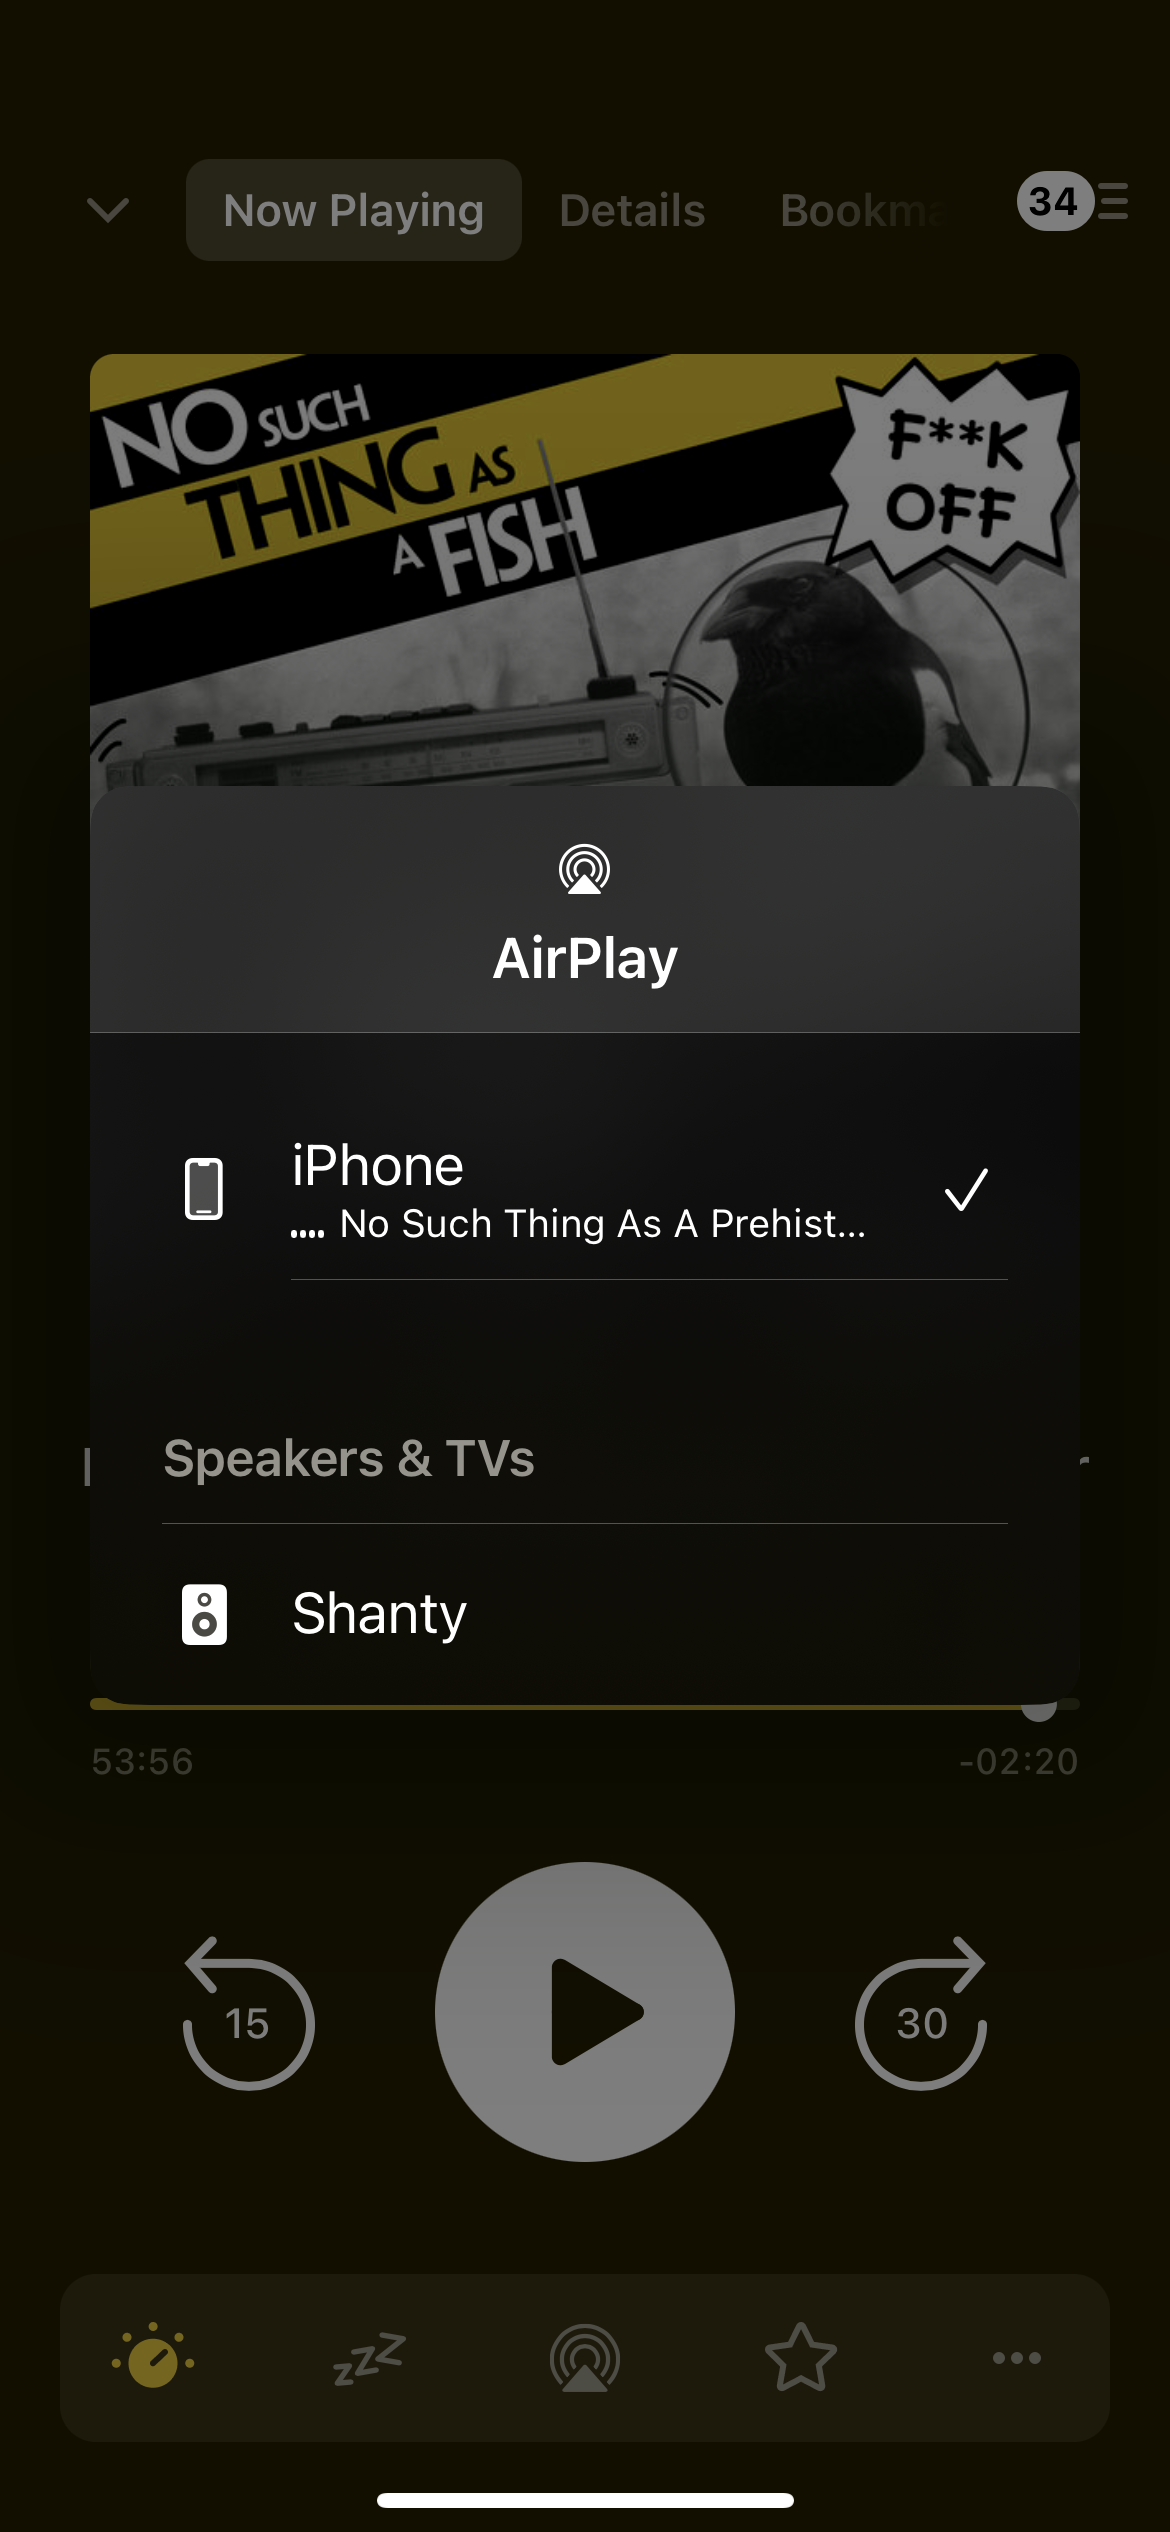
If there are no errors, it is time to configure it for snapcast.
Configuration
To add Shairport Sync as a source for snapserver, edit /etc/snapserver.conf and add the airport url to the [stream] section. The snapserver documentation lists all the configuration parameters, but we will only really need the name and devicename parameters. name sets the name that will be displayed by snapserver. devicename sets the name which will be displayed in the AirPlay menu. Note that special characters (such as spaces) must be URL encoded:
[stream]
source = airplay:///usr/local/bin/shairport-sync?name=AirPlay&devicename=DadBug%20Multiroom
Because AirPlay 2 itself is a multi-room capable system, there is a bit of delay when using it, about 2 seconds, but I believe that can be configured in shairport-sync. It doesn’t bother me, however, since I don’t use it as often as Spotify.
bluetooth
This is a stretch goal. My use case would be for Eurovision night: I could have the audio playing in multiple rooms from my laptop hooked up to the TV.
sdptool
https://askubuntu.com/questions/2573/can-i-use-my-computer-as-an-a2dp-receiver-bluetooth-speaker
Configuration: snapclient
Now that I have audio sources set up, I need to play it on speakers connected to my server.
For troubleshooting, I installed the alsa-utils package. I could then test the sound output worked:
$ speaker-test -c 2
I could also check the output volume and mute status using alsamixer, an ncurses-based TUI. This will basically be set-it-and-forget-it, since I can use the speaker volume to adjust.
I edited /etc/default/snapclient to add the alsa player as default:
SNAPCLIENT_OPTS="--player alsa"
Then restart the snapclient service:
$ sudo systemctl restart snapclient
snapweb
Snapweb is a control page that integrates with snapserver and snapclient. It displays the current stream (from snapserver) and connected snapclients. You can adjust the volume of each connected client, and select which source it is playing from (as defined in /etc/snapserver.conf above).
If you go to http:<snapserver_host>:1780, you will see the webserver that snapserver comes bundled with. However, it does not come with snapserver installed. To install it, we’ll download the latest release:
$ wget https://github.com/badaix/snapweb/releases/download/v0.6.0-beta.2/snapweb.zip
$ unzip snapweb.zip -d snapweb
Then, copy the unzipped contents to snapserver’s web root, which by default is /usr/share/snapserver:
$ sudo mv snapweb /usr/share/snapserver/
$ sudo chown -R www-data:www-data /usr/share/snapserver/snapweb
Next we’ll need to enable snapweb by uncommenting the doc_root line from /etc/snapserver.conf:
# serve a website from the doc_root location
# disabled if commented or empty
doc_root = /usr/share/snapserver/snapweb
Finally, we restart snapserver:
$ sudo systemctl restart snapserver
Then we can go to http:<snapserver_host>:1780 in a browser to see the control page.
Updates
2023-03-16: updated librespot configuration, added shairport-sync installation